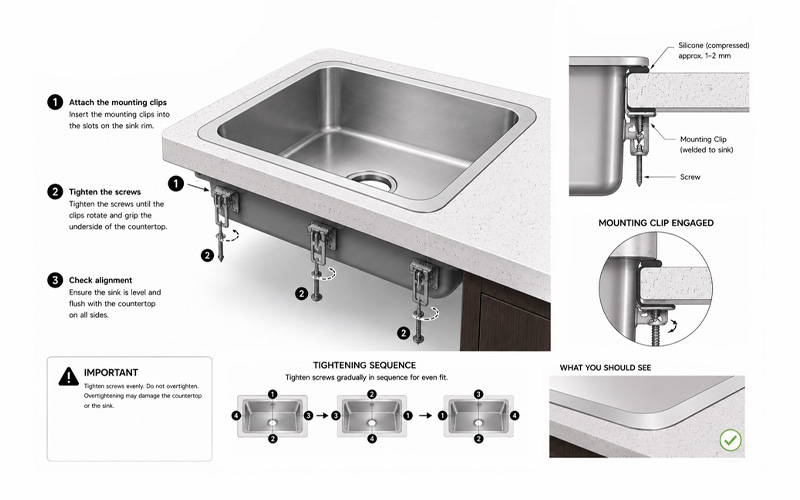
Home / Installation Installation Follow our step-by-step installation guide to ensure a precise fit, secure placement, and reliable performance for years to come. BEFORE YOU BEGIN Required Tools & Materials Prepare the following tools and materials before beginning to ensure a smooth, accurate, and secure installation. Safety Glasses Marker Silicone Adhesive Sealant Tape Measure Jigsaw Rags Wood Support Blocks Level Screws Bladed Screwdriver Top Mount Installation Guide Under Mount Installation Guide Top Mount Installation Instructions Step 1: Position the Cutout Template and Trace the Outline. 1 Confirm that the cutout template matches the actual sink size. Place the template in the desired location on the countertop. Secure it if needed, then trace the outline with a pencil. Step 2: Cut the Opening 2 Cut along the traced outline using the proper saw for your counter top material. Step 3: Drill the Mounting Holes 3 Turn the counter top over and drill 3/8" diameter x 1/2" deep holes, positioned 1/2" from the sink edge. Insert the anchors and lightly tap them with a hammer until flush. Step 4: Secure the Sink to the Counter top 4 Apply a continuous bead of silicone around the sink rim on the underside of the counter top. Align the sink with the cutout and press it firmly into place. Step 5: Attach the Mounting Hardware 5 Install the fixing clamps and screws to secure the sink to the countertop. Remove any excess sealant around the rim. Allow the sealant to cure for 30-60 minutes. Step 6: Install the Plumbing Fixtures 6 Connect the drain assembly to the sink, then attach the trap. Connect the water supply lines to the faucet following the manufacturer's instructions. Run water and check all connections for leaks. Under Mount Installation Instructions Step 1: Position the Cutout Template and Trace the Outline. 1 Confirm that the cutout template matches the actual sink size. Place the template in the desired location on the countertop. Secure it if needed, then trace the outline with a pencil. Step 2: Cut the Opening 2 Cut along the traced outline using the proper saw for your counter top material. Step 3: Install Mounting Hardware 3 Secure the mounting hardware onto the prongs extending from the underside of the sink rim. Ensure the hooked side of each mounting clip is oriented away from the sink. Step 4: Apply Sealant 4 Ensure the surface around the sink opening is clean and completely dry. Turn the sink upside down to apply the sealant. Apply a silicone-based sealant (not included) along the underside edge of the sink. Step 5: Installing the Sink onto the Countertop 5 Place the sink into the cutout opening, verify proper alignment, and press down firmly. Tighten the front mounting screws first, then secure the screws at the back and sides of the sink. Wipe away any excess silicone-based sealant. Allow the sealant to cure for 30-60 minutes. Step 6: Install the Plumbing Fixtures 6 Connect the drain assembly to the sink, then attach the trap. Connect the water supply lines to the faucet following the manufacturer's instructions. Run water and check all connections for leaks.